I have worms.
And if you’d like to expand your gardening world you could have worms too.
So join me as I show you how I set up my system for raising worms and establish a worm farm.
Hi, I’m Gardener Scott.
And today I’m starting my worm farm. And you might be asking why I’m starting a worm farm.
And maybe more important why I think you should start a worm farm.
Now, I call it a worm farm.
But it’s really nothing more than a plastic bin that I put organic material in, and then I put some worms in, and then the worms eat all of that organic material.
And the result is worm castings.
Now, worm castings is a polite way of saying worm manure or better yet worm poop.
And if you bought any at a nursery you probably know it costs quite a bit.
In fact it costs so much that you really can’t use a lot of it in your garden.
Which is why you want the worm castings.
If you make your own worm farm you can create castings month after month and the worms… well, they’ll propagate.
They’ll double in almost no time. I’m starting with one bin.
Six months from now I’ll probably have two or three bins producing endless worm castings.
This process is called Vermicomposting.
And I think it’s ideal for small-scale gardeners in particular who might not have room for a full compost pile, but they really don’t want to keep throwing away their kitchen scraps.
Well, the worms will eat your kitchen scraps.
So you might not have enough for a full pile, but you’ll have enough to feed your worms and give you those great castings.
I’m setting up my vermicomposting system in my basement.
This stays relatively warm in the winter, relatively cool in the summer, and that’s important because if the temperature drops below 40 degrees Fahrenheit, well the worms suffer. They stop eating and might even die.
Temperatures get above 90 degrees Fahrenheit, the same thing happens.
So there’s a narrow range the worms live in and ideally, they’re operating around 60 to 70 degrees Fahrenheit. That’s when they’re eating the most and propagating the most.
Well, that’s indoor temperatures for most of us.
I’ll talk more about the worms when they come and I put them in my bin.
I’ve ordered them online and I’m expecting them next week. To begin, all I’ve done is taken an 18-gallon plastic tote. This will be the home of my worms for the future.
And then I drilled holes in the top to allow for some air flow.
Now, it’s very important to get that air flow to the worms. They’re living animals. Without the air they’ll suffocate and die.
Your choices are varied.
I like to do the holes in the top of the lid and there’s a reason for that. I used to do worms… and I’d put holes in the side close to the top.
But when it starts getting humid inside this bin the worms are actually going to crawl up the sides and when they encounter holes on the side, they’ll actually crawl through.
And it’s not surprising if you have a basement… you walk down and you see some of your worms trying to escape across the floor.
By drilling the holes in the top, they’ll still crawl up the sides.
If they actually make it to the top and crawl out some of those holes, well, it’s just as likely that they’ll fall back down through the holes to where I want them to be. They’re not as likely to escape.
I’ll actually be comparing the worms to other animals that you might have on your farm or homestead.
And the first correlation I’m going to draw is to horses or chickens.
When you have domesticated animals like that in the barn or in the chicken coop, you need to have bedding.
You need to have some dry material so that when the horses or the chickens are sleeping or eating or walking around and they’re pooping and they’re peeing.
There needs to be some dry material to absorb that moisture and help keep their home relatively clean.
Well we’re doing the same thing with the worms. We start with worm bedding material.
It’ll absorb a lot of the moisture and help keep their home a little nicer.
I start by filling about a third of this bin with shredded newspaper and chunks of cardboard.
You may have seen where instead of dry bedding at this point the person doing the worms puts in wet betting. Well, the very first time I did worms I had lots of problems.
And I think the biggest problem, especially for first-timers, is getting the moisture level right within the bin.
It’s really easy for the whole thing to get too wet very fast.
And when it gets too wet, well, the worms can drown and that’s why they tend to try to escape out those holes.
So by starting with dry material it will absorb a lot of that extra moisture. And there’s going to be a lot.
Eventually the worms will eat this newspaper and eat this cardboard, but until then it helps moderate the moisture levels.
So I begin filling about a third of this bin with that dried newspaper and cardboard and now I do add some wet cardboard and newspaper.
This is actually the layer that the worms are going to rest on initially.
And worms need to be kept moist. So it makes perfect sense to have moist cardboard and newspaper.
So I just took this plastic tub put in some of the shredded newspaper and the chunks of cardboard and then I poured water in and just let it soak.
And now that has been soaking for a while, I’ll just take it out.
I’ll try to wring out any extra water that might be in there and then I’ll spread it all over the top of this bin.
And so with this nice wet layer for the worms to reside in first.
Ready to actually feed them as the next step. Now, this is food for them.
And I really don’t need any additional food.
I could just throw the worms in and they’ll start eating the newspaper.
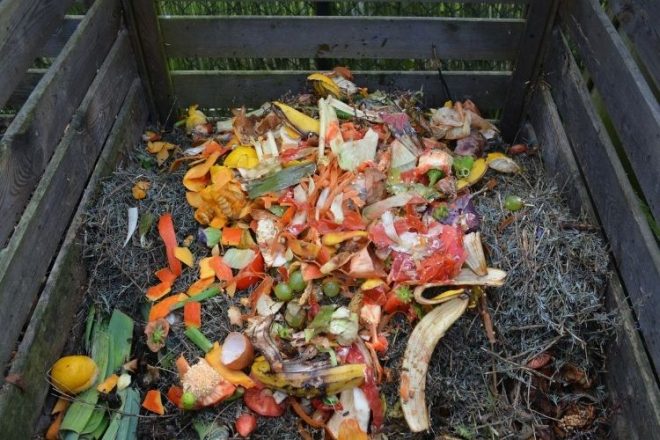
But I do have a lot of kitchen scraps that I’ve prepared for them. So that’s what I’ll add next.
Worms can eat as much as half their body weight every day.
And I ordered a pound of worms. So that means in the first two days, I’m going to need a pound of food.
Now the newspaper and cardboard is part of that, but I’m planning to give them a full pound, and actually a little bit more than that, for their first couple days in this bin.
I want the worms to have some nice, tasty vegetables when they arrive so I’ve been saving kitchen scraps for a while.
And as I got them I’d stick them in the freezer until I had a good supply of frozen vegetable scraps.
I took the frozen vegetables that I had saved, added some water, and put them in my blender to completely pulverize the vegetables.
Now you don’t have to do this step because if worms can eat cardboard chunks, they can easily eat banana peels and chunks of cucumber.
But the way I think, they’re probably going to be stressed from their travels because they’re going to arrive in the mail.
So I want to make that first meal as easy as possible.
So by grinding up those vegetables into little tiny pieces it’s easy for the worms to eat.
So here is their breakfast, lunch, and dinner for the first couple days.
And I’m going to just spread this on top of the wet cardboard and newspaper.
Remember I mentioned that earthworms had very similar characteristics to other barnyard animals.
Well, chickens and earthworms have a digestive system that is very similar.
Did you know that earthworms have gizzards just like chickens and turkeys?
And so when they begin to eat they actually need some grit that is in their gizzard to help grind up their food.
Well, we need to add grit to the food, to the whole bin.
One of the ways to do that is to take some of your garden soil.
It’ll also add some minerals to this entire bin.
So I’ve sifted it so it’s very fine particles.
And now I’ll just spread it throughout the bin.
It doesn’t take much because earthworms are small but we need to have some of those particles to help out their gizzard.
Earthworms use a lot of calcium in their digestive process as well. So I like to save eggshells and use that as grit.
I’ll take the eggshells and pulverize them in my food processor.
And then for extra added benefit I’ll add some biochar The biochar and the eggshells together in the food processor make some wonderful grit for the worms.
And then I just spread that mix of the eggshells and the biochar on top of where I had spread the little bit of garden soil.
This is really nice because as those small pieces of biochar work their way through the earthworm’s gut they’re actually going to be inoculated with wonderful soil bacteria.
And so my worm farm is all set up ready to go.
I will add one more thin layer of wet shredded newspaper.
We don’t want it to be a sterile environment.
We do want some bacteria, particularly that soil bacteria in place when the worms arrive.
So as they start eating all this food, that bacteria starts working its way through their system and then is distributed in their wonderful castings.
That’s one of the things that makes it so great So we’re done with this.
I’m going to cover it and then wait a few days for that bacteria to grow and that should coincide pretty closely to the time that my worms arrive in the mail.
Today I got my worms.
They actually came one day early.
But that’s okay. So now I’ll take them out and have a look at them.
There’s holes in the boxes so that they stay alive during transport.
But I want to get this box open get some air inside and get them into the bin as soon as possible. They arrive in a bag.
And inside this bag are hundreds and hundreds of live worms.
The worms are all ready to just dump right in this bin.
But first I’m going to add a little more food that I had saved for them. There’s all of that pulverized food, but I’m gonna give them some chunky food.
So they can crawl around it, eat it and be well distributed within the bed.
And so with the food and the bedding in place, I’m just gonna dump all of these worms in.
They’re moving around. Sometimes if the weather is pretty cold they’ll be in big clumps.
There’s really no reason to try to separate these. The worms will take care of it themselves.
So I’ll just spread them out around the bed a little bit.
And they’re in their happy home.
These are red wiggler worms.
And they don’t like the light at all. So they’ll start burrowing away from it right away.
So I leave the lid off so that they will start digging into the bedding and the food. And in just a couple minutes there really aren’t many worms left to be seen.
With the worms nestled in the bin, now I’ll just put a few sheets of folded newspaper on top.
That’ll help hold in some of the moisture.
I’ll put the lid on and I can just walk away at this point for a number of days.
They’ve got at least two days of food with that extra helping I put on top.
That’s probably another one or two days of food.
I’ll check on them periodically every two or three days just to make sure everything is fine. And I’ll do a follow-up video in about a month that’ll show how I feed them, how I take care of them.
But for this initial phase it’s really easy because they’ve got so much bedding and so much food.
I only need to add more every four or five days.
And you do need to be aware of that feeding schedule, what works best for you. Because if you feed them too often and too much before they have a chance to eat what you fed them the previous time, there’s a lot of problems that can develop.